0x0 QEMU简介
QEMU是一款开源的模拟器及虚拟机监管器(Virtual Machine Monitor, VMM)。QEMU主要提供两种功能给用户使用,一是作为用户态模拟器,利用动态代码翻译机制来执行不同于主机架构的代码。二是作为虚拟机监管器,模拟全系统,利用其他VMM(Xen, KVM, etc)来使用硬件提供的虚拟化支持,创建接近于主机性能的虚拟机。
系统模式(虚拟机监管器qemu-system):功能类似于VMware或者VMtools,对整个系统进行虚拟化运行,相当于启动了另外一个虚拟机系统。用户模式(用户态模拟器qemu):将单独的可执行文件使用虚拟化环境运行,例如在x86架构的环境下执行mips可执行文件等,便于进行进一步的动态调试等工作。
0x1 系统模式调试固件
0x11 安装qemu系统模式
qemu系统模式可以直接通过包管理器安装:
//macOS
$ brew install qemu
//Linux
$ apt install qemu
0x12 启动参数
使用qemu系统模式,需要的文件以一段qemu启动参数作为例子,重点文件在于系统内核
kernel和文件系统rootfs.img,获取到这两个文件后,还需弄清楚kernel对应的cpu类型,使用的内存大小等信息:qemu-system-arm \
-kernel ./kernel \
-dtb ./kernel.dtb \
-cpu arm1176 \
-m 256 \
-M versatilepb \
-serial stdio \
-append "root=/dev/sda2 panic=1 rootfstype=ext4 rw" \
-hda rootfs.img
-kernel: 指定kernel文件。
-dtb: 指定dtb(Device Tree Blob)文件,假如kernel包含dtb。
-cpu: 指定cpu类型。(qemu-system-arm -M highbank -cpu help查看可选项,(这个可能版本有bug, 必须指定-M才能查看))
-m: 指定内存大小。
-M: 制定机器类型。 (qemu-system-arm -machine help查看可选项)
-serial: 重定向串口。
-append: 为kernel指定启动参数。
-hda: 指定磁盘镜像。
qemu系统模式工具(末尾为cpu类型)
qemu-system-aarch64      qemu-system-microblaze   qemu-system-or1k         qemu-system-sh4eb
qemu-system-alpha        qemu-system-microblazeel qemu-system-ppc          qemu-system-sparc
qemu-system-arm          qemu-system-mips         qemu-system-ppc64        qemu-system-sparc64
qemu-system-cris         qemu-system-mips64       qemu-system-ppcemb       qemu-system-tricore
qemu-system-hppa         qemu-system-mips64el     qemu-system-riscv32      qemu-system-unicore32
qemu-system-i386         qemu-system-mipsel       qemu-system-riscv64      qemu-system-x86_64
qemu-system-lm32         qemu-system-moxie        qemu-system-s390x        qemu-system-xtensa
qemu-system-m68k         qemu-system-nios2        qemu-system-sh4          qemu-system-xtensaeb
支持的cpu类型参数
$ qemu-system-arm -M highbank -cpu help
Available CPUs:
  arm1026
  arm1136
  arm1136-r2
  arm1176
  arm11mpcore
  arm926
  arm946
  cortex-a15
  cortex-a7
  cortex-a8
  cortex-a9
  cortex-m3
  cortex-m33
  cortex-m4
  cortex-r5
  cortex-r5f
  max
  pxa250
  pxa255
  pxa260
  pxa261
  pxa262
  pxa270-a0
  pxa270-a1
  pxa270
  pxa270-b0
  pxa270-b1
  pxa270-c0
  pxa270-c5
  sa1100
  sa1110
  ti925t
支持的机器类型参数
$ qemu-system-arm -machine help
Supported machines are:
akita                Sharp SL-C1000 (Akita) PDA (PXA270)
ast2500-evb          Aspeed AST2500 EVB (ARM1176)
borzoi               Sharp SL-C3100 (Borzoi) PDA (PXA270)
canon-a1100          Canon PowerShot A1100 IS
cheetah              Palm Tungsten|E aka. Cheetah PDA (OMAP310)
collie               Sharp SL-5500 (Collie) PDA (SA-1110)
connex               Gumstix Connex (PXA255)
cubieboard           cubietech cubieboard
emcraft-sf2          SmartFusion2 SOM kit from Emcraft (M2S010)
highbank             Calxeda Highbank (ECX-1000)
imx25-pdk            ARM i.MX25 PDK board (ARM926)
integratorcp         ARM Integrator/CP (ARM926EJ-S)
kzm                  ARM KZM Emulation Baseboard (ARM1136)
lm3s6965evb          Stellaris LM3S6965EVB
lm3s811evb           Stellaris LM3S811EVB
mainstone            Mainstone II (PXA27x)
mcimx7d-sabre        Freescale i.MX7 DUAL SABRE (Cortex A7)
midway               Calxeda Midway (ECX-2000)
mps2-an385           ARM MPS2 with AN385 FPGA image for Cortex-M3
mps2-an505           ARM MPS2 with AN505 FPGA image for Cortex-M33
mps2-an511           ARM MPS2 with AN511 DesignStart FPGA image for Cortex-M3
musicpal             Marvell 88w8618 / MusicPal (ARM926EJ-S)
n800                 Nokia N800 tablet aka. RX-34 (OMAP2420)
n810                 Nokia N810 tablet aka. RX-44 (OMAP2420)
netduino2            Netduino 2 Machine
none                 empty machine
nuri                 Samsung NURI board (Exynos4210)
palmetto-bmc         OpenPOWER Palmetto BMC (ARM926EJ-S)
raspi2               Raspberry Pi 2
realview-eb          ARM RealView Emulation Baseboard (ARM926EJ-S)
realview-eb-mpcore   ARM RealView Emulation Baseboard (ARM11MPCore)
realview-pb-a8       ARM RealView Platform Baseboard for Cortex-A8
realview-pbx-a9      ARM RealView Platform Baseboard Explore for Cortex-A9
romulus-bmc          OpenPOWER Romulus BMC (ARM1176)
sabrelite            Freescale i.MX6 Quad SABRE Lite Board (Cortex A9)
smdkc210             Samsung SMDKC210 board (Exynos4210)
spitz                Sharp SL-C3000 (Spitz) PDA (PXA270)
sx1                  Siemens SX1 (OMAP310) V2
sx1-v1               Siemens SX1 (OMAP310) V1
terrier              Sharp SL-C3200 (Terrier) PDA (PXA270)
tosa                 Sharp SL-6000 (Tosa) PDA (PXA255)
verdex               Gumstix Verdex (PXA270)
versatileab          ARM Versatile/AB (ARM926EJ-S)
versatilepb          ARM Versatile/PB (ARM926EJ-S)
vexpress-a15         ARM Versatile Express for Cortex-A15
vexpress-a9          ARM Versatile Express for Cortex-A9
virt-2.10            QEMU 2.10 ARM Virtual Machine
virt-2.11            QEMU 2.11 ARM Virtual Machine
virt-2.12            QEMU 2.12 ARM Virtual Machine
virt-2.6             QEMU 2.6 ARM Virtual Machine
virt-2.7             QEMU 2.7 ARM Virtual Machine
virt-2.8             QEMU 2.8 ARM Virtual Machine
virt-2.9             QEMU 2.9 ARM Virtual Machine
virt                 QEMU 3.0 ARM Virtual Machine (alias of virt-3.0)
virt-3.0             QEMU 3.0 ARM Virtual Machine
witherspoon-bmc      OpenPOWER Witherspoon BMC (ARM1176)
xilinx-zynq-a9       Xilinx Zynq Platform Baseboard for Cortex-A9
z2                   Zipit Z2 (PXA27x)
0x13 启动示例
0x131 获取必备文件
以树莓派raspberrypi为例,Raspbian 的镜像有两个版本,一个带图形界面的完整版和一个没有图形界面的 lite 版本,对于分析而言 lite 版本就足够了,本次获取最新镜像文件为
2018-11-13-raspbian-stretch-lite.zip。
此外,还需qemu版kernel,下载对应kernel版本
kernel-qemu-4.14.50-stretch和dtb文件versatile-pb.dtb(kernel-qemu-4.*.*-stretch等较新kernel需要dtb文件,老版本不用)。若调试的IoT镜像kernel不支持,可自行编译对应版本的kernel,或者使用树莓派的kernel。
解开镜像后,在macOS里树莓派镜像双击即可挂载,挂载后内容如下:
➜ /Volumes/boot >file *
COPYING.linux:            ASCII text
LICENCE.broadcom:         ASCII text
LICENSE.oracle:           UTF-8 Unicode text, with very long lines
bcm2708-rpi-0-w.dtb:      Device Tree Blob version 17, size=23315, boot CPU=0, string block size=2279, DT structure block size=20964
bcm2708-rpi-b-plus.dtb:   Device Tree Blob version 17, size=23071, boot CPU=0, string block size=2299, DT structure block size=20700
bcm2708-rpi-b.dtb:        Device Tree Blob version 17, size=22812, boot CPU=0, string block size=2244, DT structure block size=20496
bcm2708-rpi-cm.dtb:       Device Tree Blob version 17, size=22589, boot CPU=0, string block size=2225, DT structure block size=20292
bcm2709-rpi-2-b.dtb:      Device Tree Blob version 17, size=24115, boot CPU=0, string block size=2371, DT structure block size=21672
bcm2710-rpi-3-b-plus.dtb: Device Tree Blob version 17, size=25574, boot CPU=0, string block size=2538, DT structure block size=22964
bcm2710-rpi-3-b.dtb:      Device Tree Blob version 17, size=25311, boot CPU=0, string block size=2447, DT structure block size=22792
bcm2710-rpi-cm3.dtb:      Device Tree Blob version 17, size=24087, boot CPU=0, string block size=2319, DT structure block size=21696
bootcode.bin:             data
cmdline.txt:              ASCII text
config.txt:               ASCII text
fixup.dat:                data
fixup_cd.dat:             data
fixup_db.dat:             data
fixup_x.dat:              data
issue.txt:                ASCII text
kernel.img:               Linux kernel ARM boot executable zImage (little-endian)
kernel7.img:              Linux kernel ARM boot executable zImage (little-endian)
overlays:                 directory
start.elf:                ELF 32-bit LSB executable, Broadcom VideoCore III, version 1 (SYSV), statically linked, stripped
start_cd.elf:             ELF 32-bit LSB executable, Broadcom VideoCore III, version 1 (SYSV), statically linked, stripped
start_db.elf:             ELF 32-bit LSB executable, Broadcom VideoCore III, version 1 (SYSV), statically linked, stripped
start_x.elf:              ELF 32-bit LSB executable, Broadcom VideoCore III, version 1 (SYSV), statically linked, stripped
双击挂载实际只挂载了第一个启fat32分区,并没有挂载文件系统。通过fdisk指令查看镜像,可以看到镜像有两个分区,其中linux文件系统分区偏移为98304*512=50331648:
//$ fdisk -l 2018-11-13-raspbian-stretch-lite.img
$ fdisk 2018-11-13-raspbian-stretch-lite.img
Disk: 2018-11-13-raspbian-stretch-lite.img geometry: 904/64/63 [3645440 sectors]
Signature: 0xAA55
         Starting       Ending
 #: id  cyl  hd sec -  cyl  hd sec [     start -       size]
------------------------------------------------------------------------
 1: 0C    0 130   3 -    6  26  18 [      8192 -      89854] Win95 FAT32L
 2: 83    6  30  25 -  226 234   8 [     98304 -    3547136] Linux files*
 3: 00    0   0   0 -    0   0   0 [         0 -          0] unused
 4: 00    0   0   0 -    0   0   0 [         0 -          0] unused
文件系统可通过如下指令进行挂载,挂载后可直接对其读写:
$ sudo mkdir /mnt/raspbian
$ sudo mount -v -o offset= 50331648 -t ext4 [path-of-your-img-file.img] /mnt/raspbian
0x132 qemu模拟raspberrypi
获取kernel和文件系统后,即可使用如下指令启动qemu来模拟raspberrypi:
$ qemu-system-arm -kernel kernel-qemu-4.14.50-stretch \
  -cpu arm1176 \
  -m 256 \
  -M versatilepb \
  -dtb versatile-pb.dtb \
  -no-reboot \
  -append "root=/dev/sda2 panic=1 rootfstype=ext4 rw" \
  -net nic \    #使用默认NAT方式连接网络
  -net user,hostfwd=tcp::5022-:22 \   # 为 ssh 预留,将模拟器的22端口转发到电脑5022端口
  -net user,hostfwd=tcp::2333-:2333 \   # 为 gdbserver 预留,用于远程调试
  -hda 2018-11-13-raspbian-stretch-lite.img
启动成功后界面如下,树莓派系统默认账户(pi)密码(raspberry):

遇到的坑
- Error: unrecognized/unsupported machine ID (r1 = 0x00000183).
kernel-qemu-4.*.*-stretch等较新kernel需要加载dtb文件
0x133 调试系统
1、使用默认账户(pi)密码(raspberry)登录raspberry
2、开启 ssh 服务,并设置开机启动
2、开启 ssh 服务,并设置开机启动
$ sudo service ssh start
$ sudo update-rc.d ssh enable
3、之后即可在电脑端通过 ssh 访问虚拟机
$ ssh [email protected] -p 5022
$ scp -P 5022 *.* [email protected]:/tmp  //scp传递文件
4、安装gdb-multiarch
由于默认安装的 gdb 只支持 x86/x64 架构(可以启动 gdb 然后输入命令
由于默认安装的 gdb 只支持 x86/x64 架构(可以启动 gdb 然后输入命令
set architecture arm查看),而gdb-multiarch 是 gdb 支持多种硬件体系架构的版本,安装指令如下://安装gdb-multiarch
$ sudo apt install gdb-multiarch
//启动gdb-multiarch
$ gdb-multiarch
5、编译gdbserver
虽然Raspbian 系统中自带 gdb,但如果调试其他IoT系统,则可能需要自己下载对应版本源码并编译相应版本的gdbserver:
虽然Raspbian 系统中自带 gdb,但如果调试其他IoT系统,则可能需要自己下载对应版本源码并编译相应版本的gdbserver:
//安装交叉编译环境
$ apt install gcc-5-arm-linux-gnueabi  gcc-5-arm-linux-gnueabihf
//下载解压后进入`gdb-<version>/gdb/gdbserver`目录
$ CC="arm-linux-gnueabi-gcc-5" CXX="arm-linux-gnueabi-g++-5" ./configure --target=arm-linux-gnueabi --host="arm-linux-gnueabi"
$ make install
$ file arm-linux-gnueabi-gdbserver
arm-linux-gnueabi-gdbserver: ELF 32-bit LSB executable, ARM, EABI5 version 1 (SYSV), dynamically linked, interpreter /lib/ld-linux.so.3, for GNU/Linux 3.2.0,
BuildID[sha1]=32ad2025951ee428276ac2fbadb199bfd39e2278, not stripped
6、使用 scp 将 gdbserver 上传到虚拟树莓派中并启动
//pc端
$ scp -P 5022 arm-linux-gnueabi-gdbserver [email protected]:/tmp/
//树莓派端
$ ln -s arm-linux-gnueabi-gdbserver gdbserver
$ gdbserver 0.0.0.0:2333 *
Process hello created; pid = 702
Listening on port 2333
7、电脑端gdb remote连接gdbserver
//建议先安装 gdb 增强脚本gef
$ wget -q -O- https://github.com/hugsy/gef/raw/master/scripts/gef.sh | sh
//设置目标硬件体系架构为 arm
gef> set architecture arm
//使用 gef-remote 命令连接 gdbserver,如果使用 gdb 自带的“ target remote ”命令会出现一些[非预期的问题](https://github.com/hugsy/gef/issues/7)
gef> gef-remote –q 127.0.0.1:2333
0x2 用户模式调试程序
qemu的用户模式功能比较局限,程序依赖的外部资源无法正常提供,只有静态编译的可执行程序才能比较顺利的执行。
0x21 安装qemu-user
Linux下,可以直接通过apt包管理器来安装qemu user模式工具:
$ apt install qemu-user
另外qemu-user对macOS支持不够友好,brew也未提供user模式工具,需要手动下载qemu源码编译安装,但编译过程中错误较多:
$ wget https://download.qemu.org/qemu-3.1.0.tar.xz
$ tar xvf qemu-3.1.0.tar.xz
$ cd qemu-3.1.0
$ ./configure
$ make
$ make install
安装完成后,
qemu-[cpu架构]*系列指令即qemu user工具,如32位arm为qemu-arm和qemu-arm-static,64位arm为qemu-aarch64和qemu-aarch64-static。0x22 使用用户模式执行
使用用户模式执行程序的方法很简单,只需要在原来的程序执行命令之前添加
qemu-[cpu架构]*即可,如://原来运行命令
$ <executable> <arg1> <arg2> ...
//使用qemu-arm运行
$ qemu-arm <executable> <arg1> <arg2> ...
如以Android系统中的adbd工具为例,使用对应系统架构的qemu user指令执行即可,但由于qemu模拟环境缺少Android中adbd需要的socket等资源,故adbd提示错误:
$ file adbd
adbd: ELF 64-bit LSB executable, ARM aarch64, version 1 (SYSV), statically linked, BuildID[md5/uuid]=2ef781f7497eaad0b8ba145996afd9a1, not stripped
$ qemu-aarch64 adbd
adbd E 12-26 07:15:03  5304  5304 adbd_auth.cpp:183] Failed to get adbd socket: No such file or directory
adbd E 12-26 07:15:03  5304  5304 adbd_auth.cpp:192] Failed to get adbd socket: No such file or directory
adbd: libminijail[5304]: prctl(PR_SET_SECUREBITS) failed: Operation not permitted
adbd: libminijail[5304]: locking securebits failed: Operation not permitted
libc: Fatal signal 6 (SIGABRT), code -6 (SI_TKILL) in tid 5304 (qemu-aarch64), pid 5304 (qemu-aarch64)
libc: failed to spawn debuggerd dispatch thread: Invalid argument
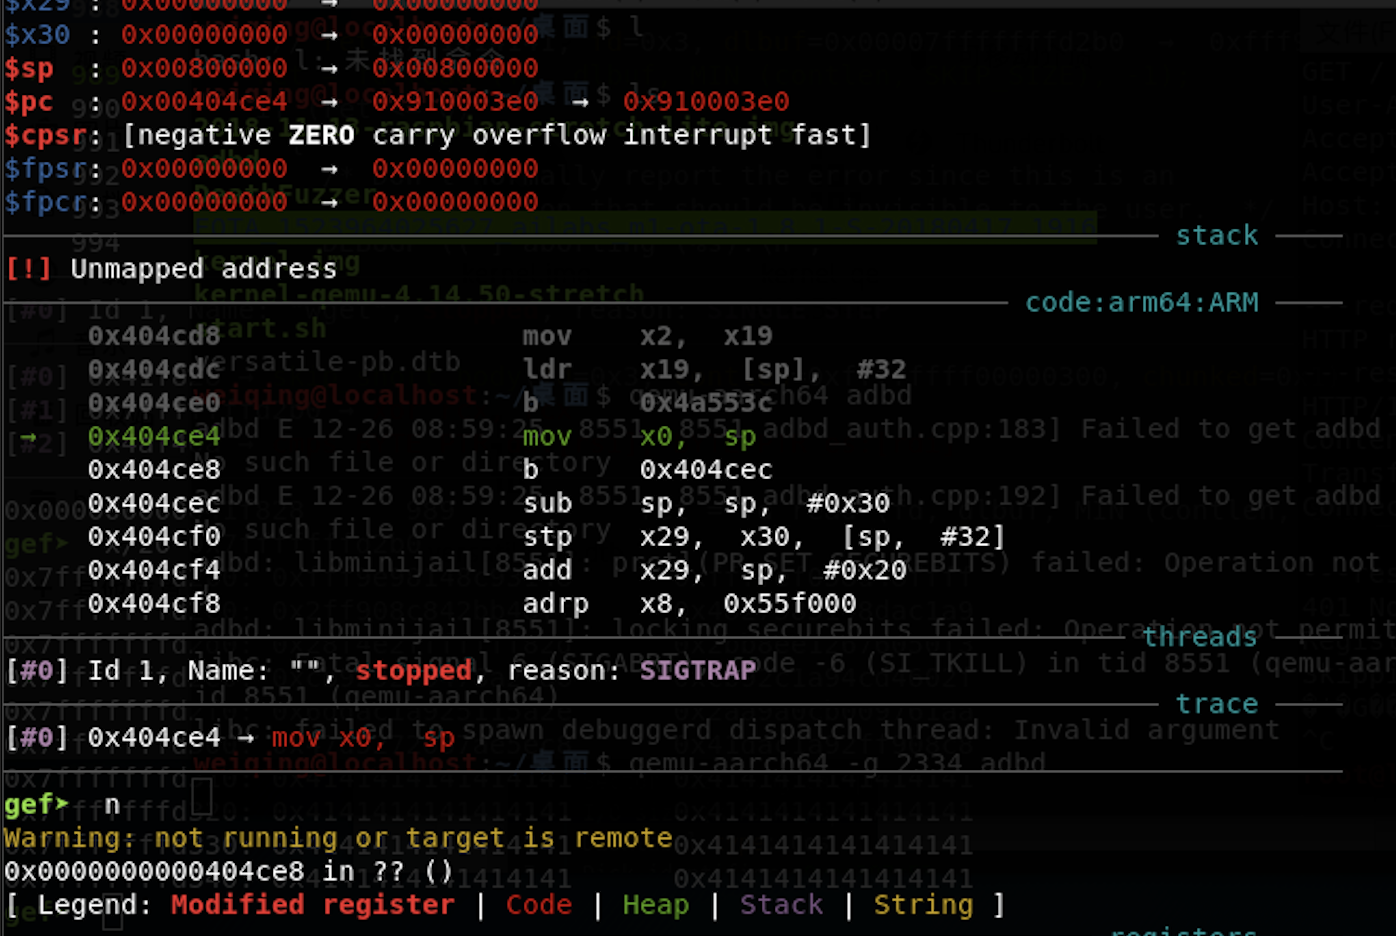
0x23 调试IoT程序
由于缺少adbd需要的外部资源,虽然运行提示错误,但其实依然是成功运行了,故可以使用gdb直接进行调试。qemu工具自带有gdbserver ,通过
-g选项可以指定监听端口,即可在另一终端中启动gdb-multiarch进行远程调试://qemu-aarch64 –g [gdbserver port] *
$ qemu-aarch64 –g 2333 adbd
//新终端
$ gdb-multiarch
gef> set architecture aarch64
gef> gef-remote –q 127.0.0.1:2333